Take orders from your buyers' procurement systems, straight into Shopify
Punchout Station connects your store to the purchasing systems big buyers use, such as SAP Ariba, Coupa, OnCare and Agora. Their staff shop your store from inside their own system, and their purchase orders arrive in Shopify as normal orders. This guide covers setup, day-to-day use, and what to do when something goes wrong.
Last updated 18 Nov 2026For store owners and staff
No guides match that search. Try a shorter word, such as terms or secret.
Get started
How PunchOut works
Large organisations buy through a procurement system, not by checking out on websites. PunchOut lets them browse your real store from inside that system and send you a purchase order (PO) for what they picked.
1. Buyer clicks your storeInside their procurement system. It sends the app a setup request with their identity and shared secret.
2. They shop your storeYour normal storefront opens with a PunchOut bar. Checkout is hidden.
3. They return the cartThe cart goes back to their system, priced for them, for internal approval.
4. A PO arrivesOnce approved, their system sends a purchase order to the app.
5. It lands in ShopifyAs a draft order (tests) or an order with payment terms (real POs), under the right company.
The messages between the systems use a standard format called cXML. You don't need to know it: the app reads and writes it, and explains any problem in plain English in the transaction log.
Words you'll see
Connection
One procurement system or buying organisation connected to your store, for example "OnCare". Plans count connections.
Buyer profile
One set of credentials inside a connection: an identity, a shared secret and that buyer's settings. A connection can have several, for example one per facility group.
Identity
The name the buyer's system uses for itself, such as ONCARE-NORTH. The app recognises each buyer by it.
Shared secret
A password the buyer's system sends with every message. Keep it private.
Get started
First-time setup
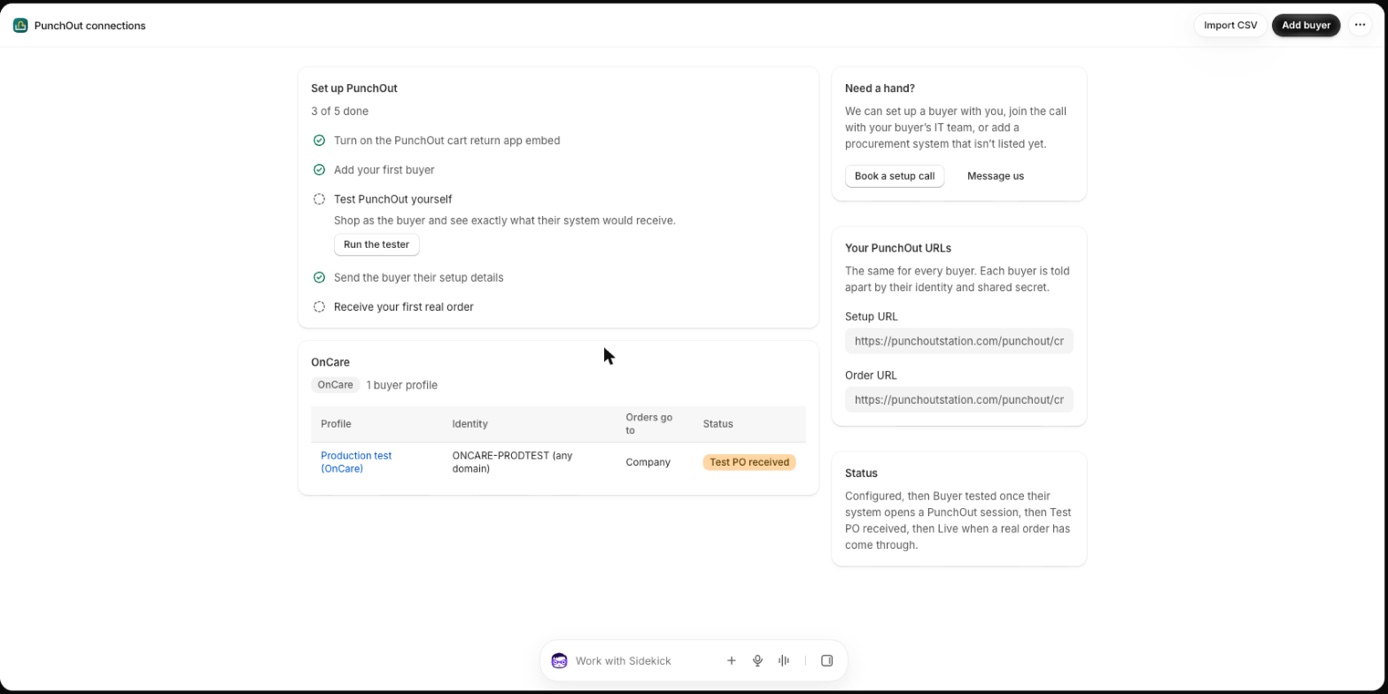
The home page of the app shows a checklist. It ticks itself off as you go and disappears once everything is done.
The home page: setup checklist, your PunchOut URLs, and your connections with each buyer's status.
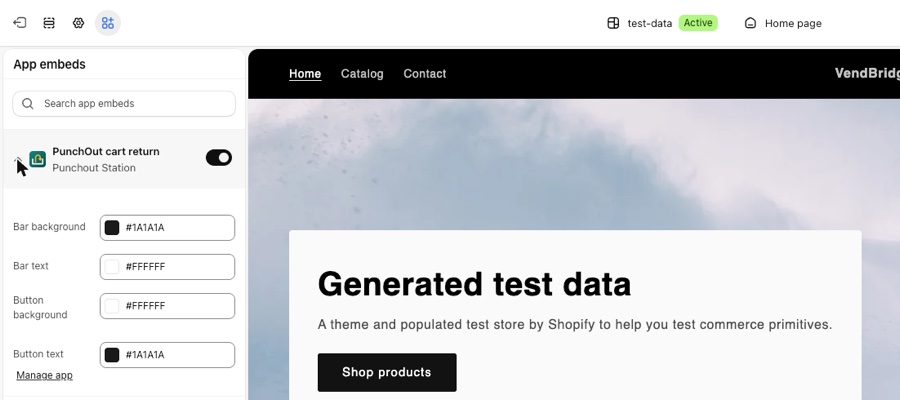
Turn on the PunchOut cart return app embed. Click Open theme editor on the checklist. In App embeds, switch on PunchOut cart return and click Save. It only shows for buyers in a PunchOut session; ordinary shoppers never see it. Optionally, set the bar and button colours to match your theme. The checklist ticks this step the next time you open the app.
Send the buyer their setup details. See Send setup details. This ticks off when their system opens its first PunchOut session.
Receive your first real order. Ticks off when a real (not test) PO becomes an order.
Theme editor, App embeds: switch on PunchOut cart return, then save the theme.
Your PunchOut URLsThe setup URL and order URL on the home page are the same for every buyer. The app tells buyers apart by their identity and shared secret, so you never need a new URL for a new buyer.
Before you start
Shopify B2B (recommended). If your plan includes B2B (Basic and up), set each buying organisation up as a company with a contact and locations. Orders then appear under the company, with its payment terms. Without B2B, orders go to a single customer instead.
SKUs. Buyers' systems order by your SKU. Give every product variant a SKU.
Payment terms. Real orders always need payment terms (for example Net 30), so they're never marked as paid. Set them on the company location or on the buyer profile.
Buyers
Add a buyer
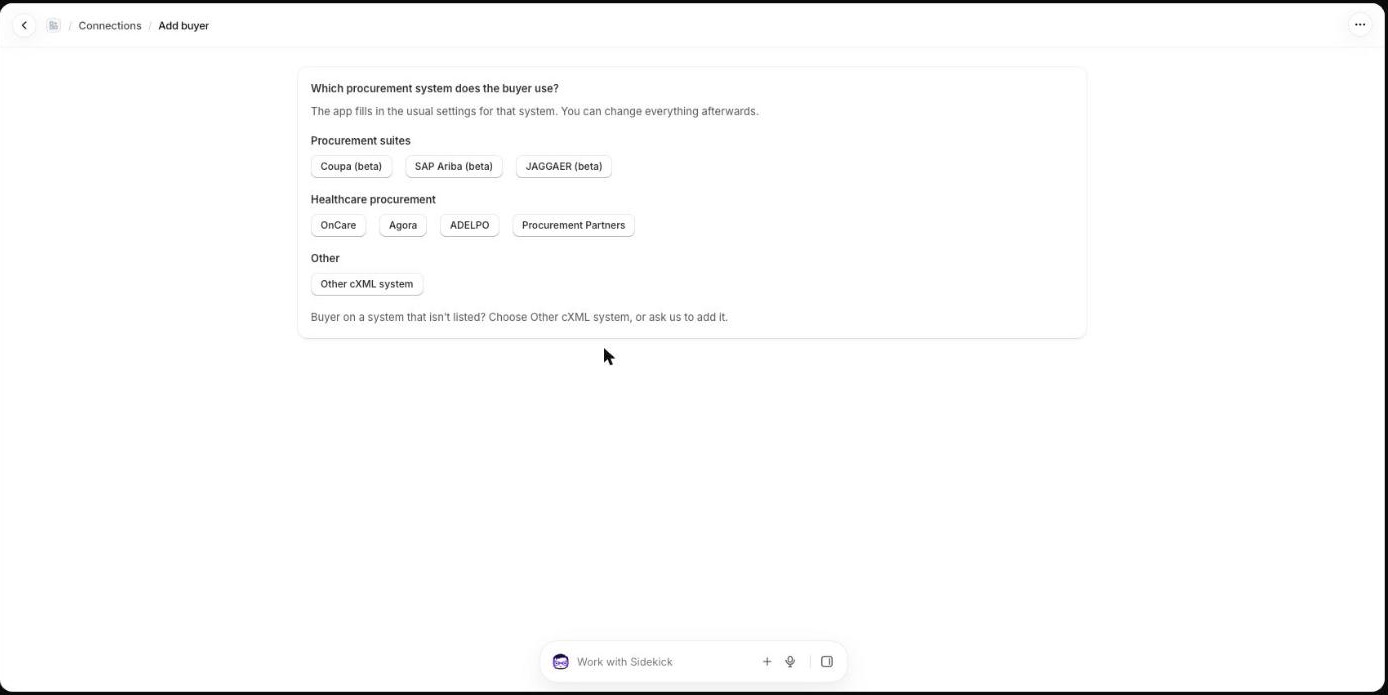
Click Add buyer on the home page, choose the buyer's procurement system, then fill in what their procurement team gave you.
Choosing the system fills in the usual settings for it. You can change everything afterwards.
Buyer
Profile name is for you, for example "Mercy Health North". Connection groups profiles from the same system or organisation: pick an existing one or create a new one.
Identity
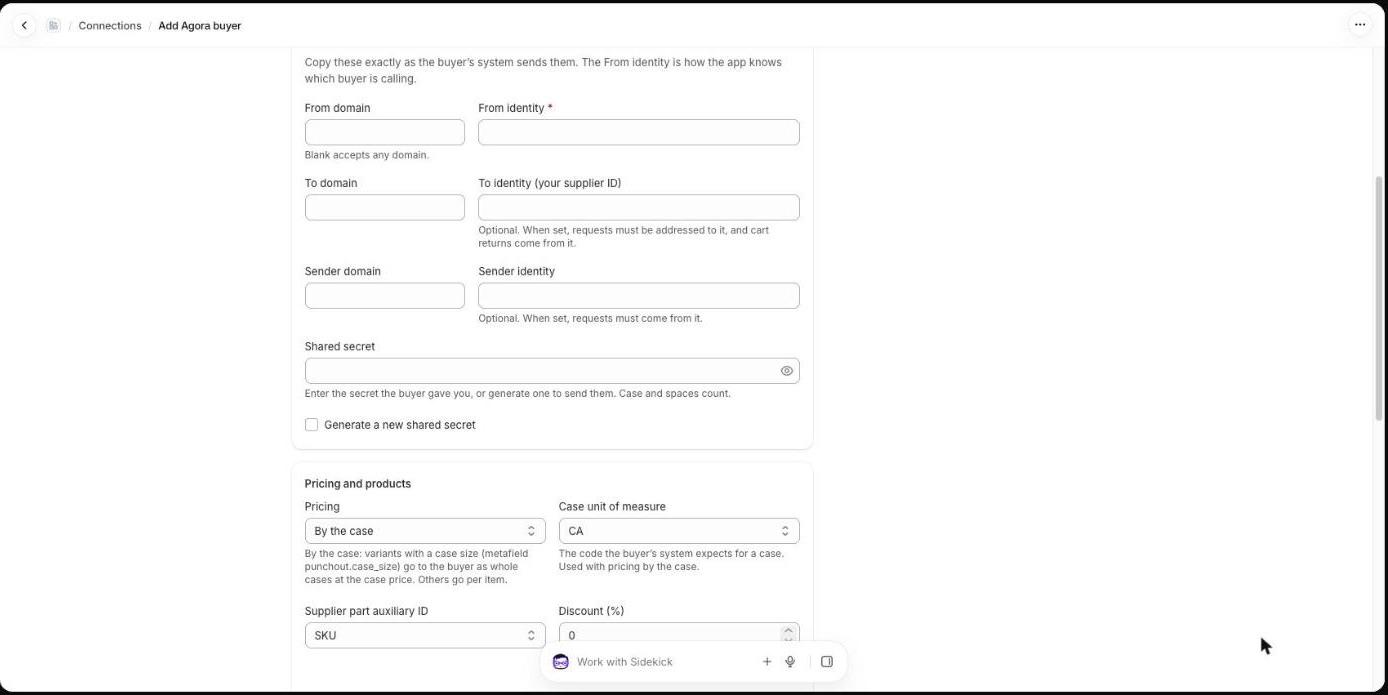
Copy these exactly as the buyer's system sends them.
From identity
Required. The buyer's identity, exactly as they send it; capitals, dashes and spaces all count. Each identity can belong to only one profile.
From domain
The type of identity, such as NetworkID or DUNS. Leave it blank to accept any; capitals don't matter.
To identity
Optional: your supplier ID in their system. When set, their messages must be addressed to it, and carts you return come from it.
Sender identity
Optional. When set, their messages must come from it.
Shared secret
Enter the secret the buyer gave you, or tick Generate a new shared secret and send it to them. It's stored encrypted and shown only to you.
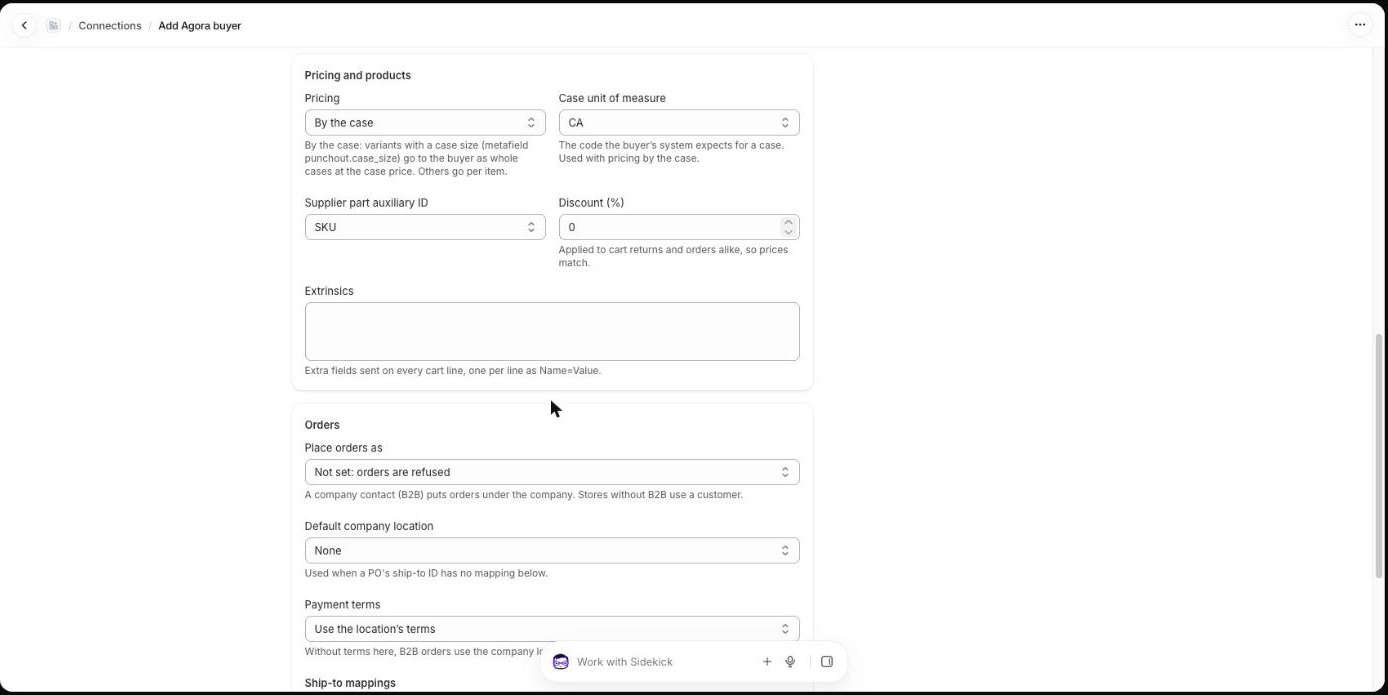
Pricing and products
Pricing, discount and extra fields, then where this buyer's orders go.
Pricing
Per item (EA), or By the case: products with a case size go to the buyer as whole cases. See Cases and units.
Case unit of measure
The code their system expects for a case: CS or CA.
Supplier part auxiliary ID
An extra product ID some systems need: SKU, variant ID or barcode. Agora needs SKU.
Discount (%)
A flat discount for this buyer. It applies to the cart they return and to their orders, so prices always match.
Extrinsics
Extra fields their system asks for on every cart line, one per line as Name=Value.
Orders
Place orders as
A company contact (B2B: orders go under the company), or a customer. If it's not set, orders are refused.
Default company location
Where orders go when the PO's ship-to ID has no mapping. See Ship-to locations.
Payment terms
Leave on Use the location's terms to use each company location's terms, or pick terms for this buyer.
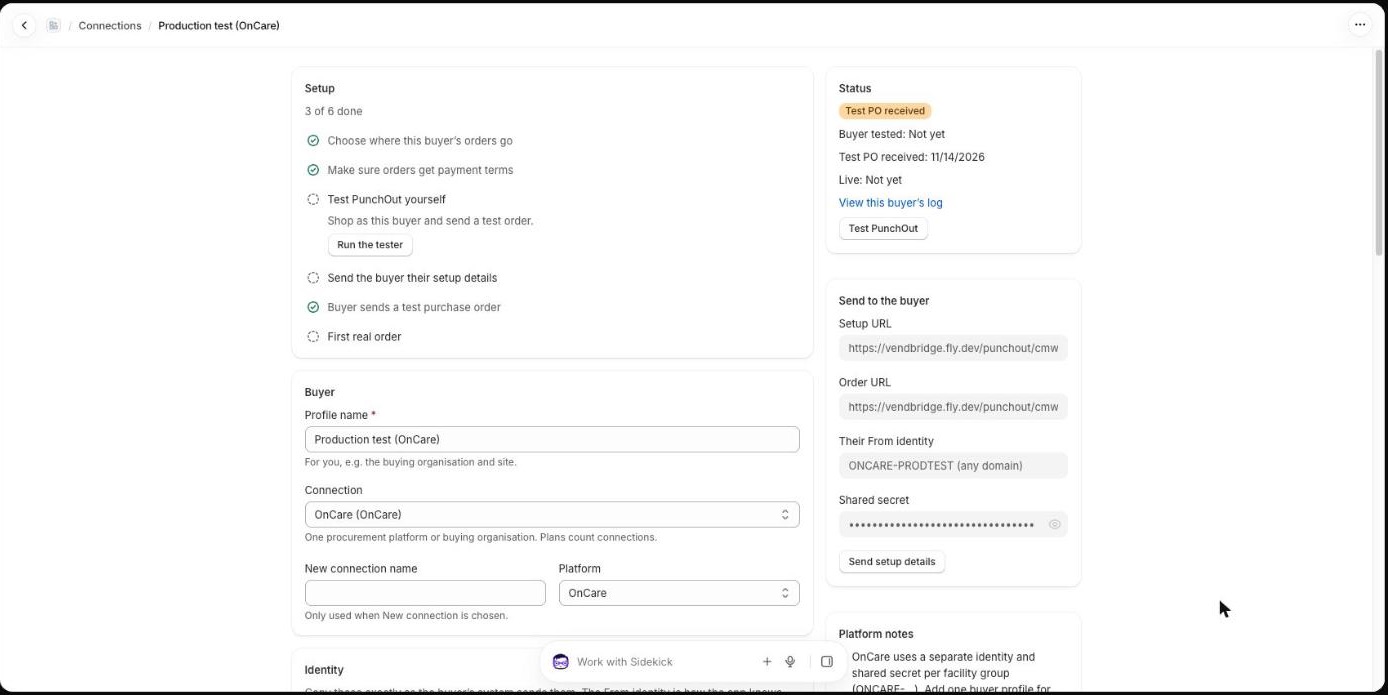
After you save, the buyer's page shows a checklist for that buyer, their status, and a Send to the buyer panel.
A buyer's page: checklist, status and the details to send them.
Buyer status
Configured→Buyer tested→Test PO received→Live
Buyer tested means their system opened a PunchOut session. Live means a real order has come through.
Buyers
Procurement systems
Each system starts with settings that work for most of its buyers. Your buyer's procurement team has the final say: if they ask for something different, change it on the profile.
System
Pricing
Case code
Auxiliary ID
Notes
OnCare
By the case
CS
None
One profile per facility group (identities like ONCARE-…). Orders may arrive through Agora's platform; that's expected. A few groups use CA.
Agora
By the case
CA
SKU
Keep the auxiliary ID on SKU, or Agora matches lines against its own catalog instead of your store. Map each facility's ship-to ID.
ADELPO
By the case
CA
None
Sends the facility's account number separately from its ship-to ID; map the account number. See Ship-to locations.
Procurement Partners
By the case
CA
None
SAP Ariba (beta)
Per item
None
You need your own Ariba Network supplier account, and must publish a PunchOut-only catalog in your Ariba test account before the buyer can test.
Coupa (beta)
Per item
None
Coupa sends a standard supplier questionnaire; the app pre-fills the answers.
JAGGAER (beta)
Per item
None
Ask the buyer's JAGGAER administrator which domain and identity they use.
Other cXML system
Per item
None
Ask the buyer for their identity, domain, and whether they need case pricing or extra fields.
Beta systems are built from the system's public documentation and haven't been confirmed with a live buyer yet. They work the same way; tell us how it goes. If your buyer uses a system that isn't listed, choose Other cXML system, or ask us about a custom connector.
Buyers
Send setup details
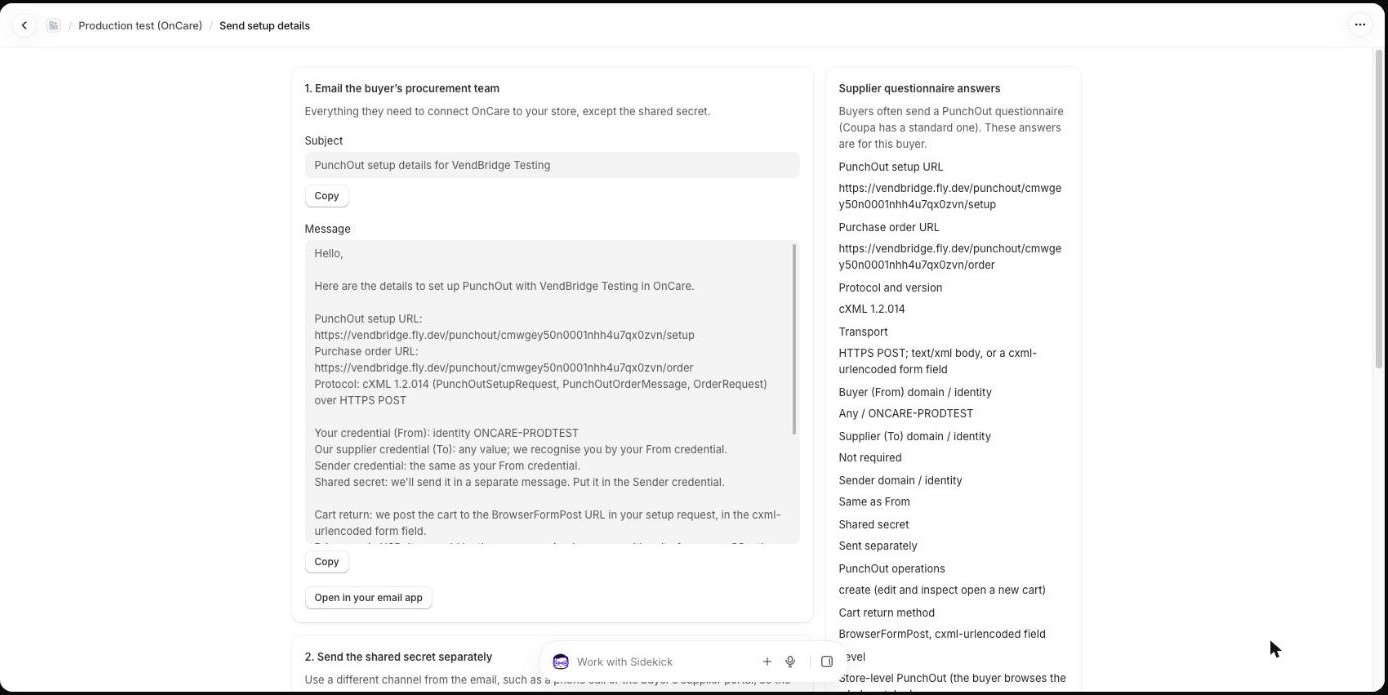
On the buyer's page, click Send setup details. The app writes the email for their procurement team, with every value they need.
Copy the email, or open it in your email app. The questionnaire answers on the right help with supplier forms.
Email their procurement team with the subject and message from section 1. It includes your setup URL, order URL and the identities to use, but not the shared secret.
Send the shared secret separately, for example by phone or through the buyer's supplier portal, so the secret and the URLs never travel together.
Supplier questionnaires. Many buyers (Coupa especially) send a form. The Supplier questionnaire answers panel has the usual answers for this buyer.
Testing on their sideBuyers test with the same URLs, marking their messages as tests. Test POs become draft orders tagged PunchOut test; they never become real orders.
Buyers
Test a connection
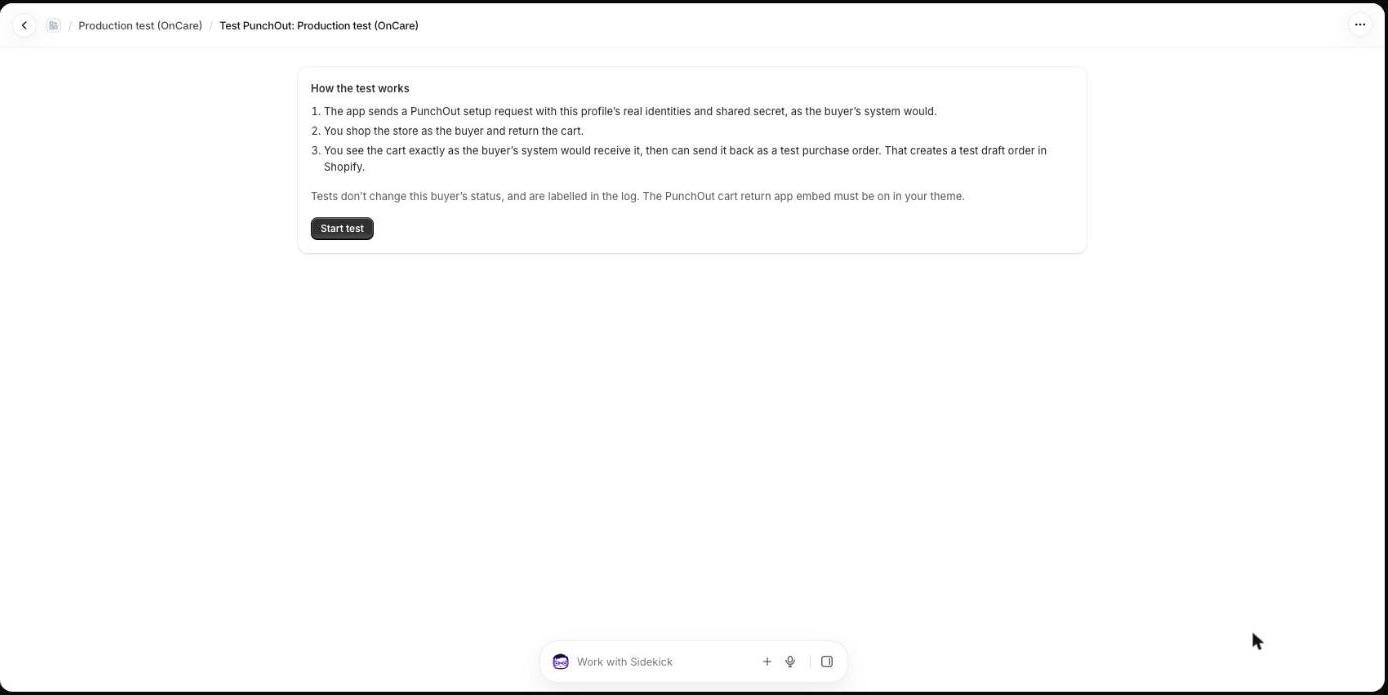
Before the buyer tests, try it yourself. On the buyer's page, click Run the tester (or Test PunchOut).
The built-in tester plays the part of the buyer's system.
The app opens a PunchOut session with this profile's real identity and shared secret, exactly as the buyer's system would.
You shop your store as the buyer and click Return cart to procurement.
You see the cart exactly as their system would receive it: quantities, units, prices with their discount. You can then send it back as a test PO, which creates a test draft order.
Tests don't change the buyer's status, and they're labelled Built-in tester in the log. The app embed must be on (see First-time setup).
Password-protected store?If your storefront still has a password page, enter the password in your browser first, then start the test.
Buyers
What buyers see
Buyers shop your normal storefront, with a few changes while they're in a PunchOut session.
The cart is emptied when the session starts, so nothing from a previous visit gets in.
A bar shows they're in a PunchOut session, with a Return cart to procurement button. Test sessions show a Test label.
Checkout is hidden: they can't pay on your store.
Return cart to procurement sends the cart to their system, prices it from your store with their discount, and empties your store's cart.
A session stays open for 4 hours and returns one cart. To shop again, they start a new session from their system.
Ordinary shoppers never see any of this.
Buyers
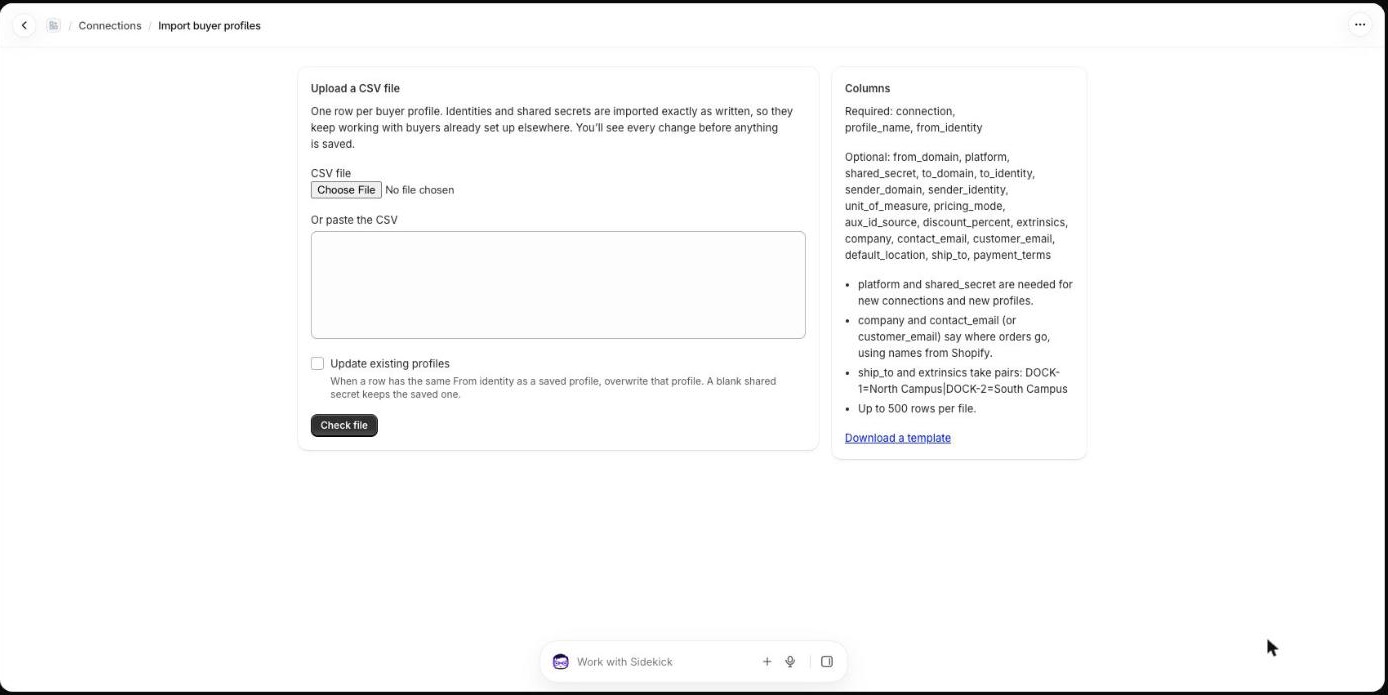
Import buyers from CSV
Moving many existing PunchOut buyers to Shopify? Import them in one go. Identities and shared secrets are kept exactly as written, so buyers already set up elsewhere keep working.
Click Import CSV on the home page. Download a template to start from.
Upload a CSV file or paste it in, then click Check file.
You'll see every row with what will happen and any problems, before anything is saved. Shared secrets are never shown back.
Fix any problems and check again. The import is all or nothing: if any row has an error, nothing is saved.
Columns
Required:connection, profile_name, from_identity.
Optional:from_domain (blank accepts any), platform and shared_secret (needed for new connections and new profiles), to_domain, to_identity, sender_domain, sender_identity, unit_of_measure (CS or CA), pricing_mode (each or case), aux_id_source, discount_percent, extrinsics, company, contact_email or customer_email, default_location, ship_to, payment_terms.
Companies, contacts, locations and payment terms are matched by their names in Shopify.
ship_to and extrinsics take pairs separated by |, for example DOCK-1=North Campus|DOCK-2=South Campus.
Up to 500 rows per file.
To change buyers you already have, tick Update existing profiles. Rows are matched by From identity; a blank shared secret keeps the saved one.
Orders
Purchase orders
When a buyer's PO arrives, the app checks it, finds the products by SKU and creates the order in Shopify. The buyer's system gets an answer straight away.
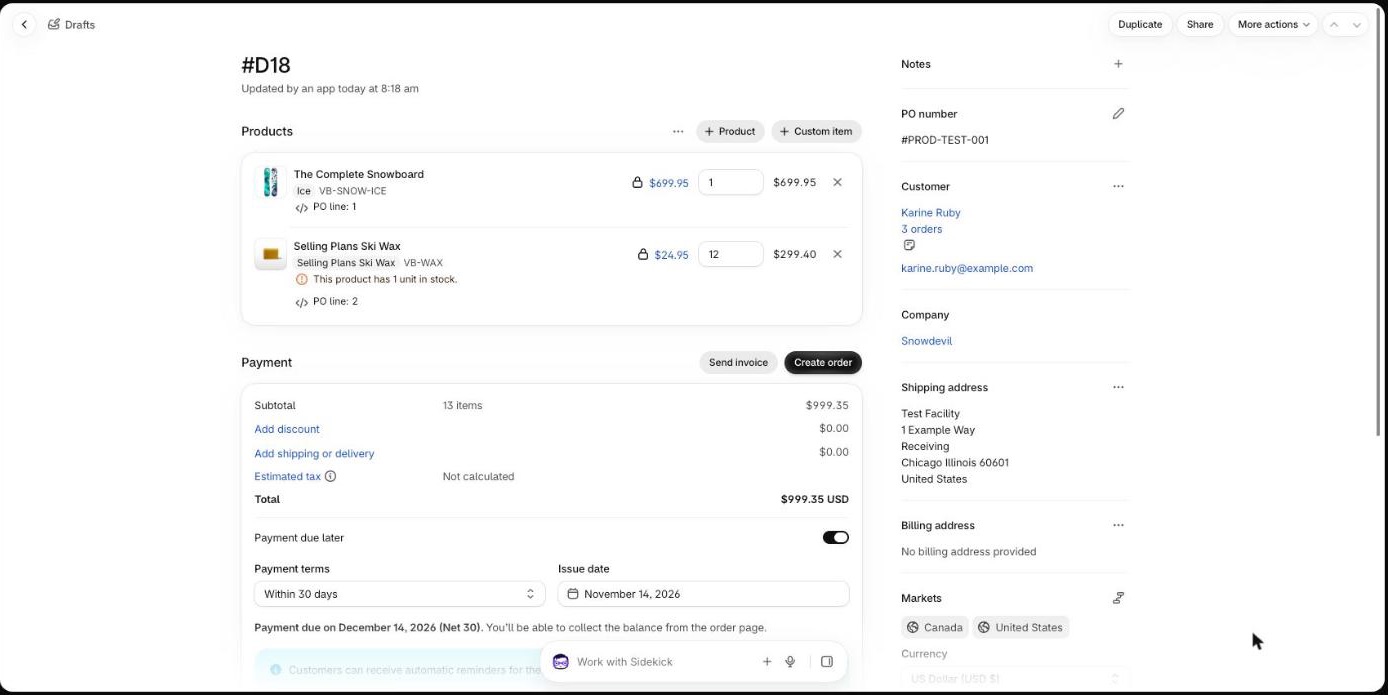
A test PO in Shopify: the PO number, company, ship-to address, PO line numbers and payment terms are filled in.
Test and real orders
Test POs become draft orders tagged PunchOut test. They stay drafts.
Real POs become orders with payment pending under the payment terms, ready to fulfil.
Orders are tagged PunchOut and the connection's name. The PO number and each line's PO line number are on the order.
Payment terms
Every PO order needs payment terms, so it's never marked as paid. The app uses, in order:
The terms set on the buyer profile.
Otherwise, the company location's terms.
For customer (non-B2B) orders, Due on receipt.
If none apply, the PO is refused and nothing is created in Shopify. The log tells you which location needs terms.
Prices
The order uses the price on the PO, because that's what the buyer's organisation approved. If it differs from the buyer's current price on your store, the order still goes through, and the log notes the difference. If the PO's total doesn't add up to its lines, that's noted too.
Repeats, changes and cancellations
The same PO sent twice (same message ID, or the same PO number for that buyer) is accepted without creating a second order.
Change orders and cancellations sent by the buyer's system aren't applied automatically. The app refuses them and logs which order they're about; make the change in Shopify yourself.
Orders
Cases and units
Your Shopify prices are per item. Many healthcare buyers order by the case. The app converts between the two, so carts and orders always agree.
Set a case size on a product
In Shopify, go to Settings → Metafields and metaobjects → Variants and add a definition with namespace and key punchout.case_size, type Integer.
On each variant sold by the case, set case_size to the number of items in a case, for example 6.
In the cart (buyers priced by the case)
A product with a case size goes to the buyer as whole cases at the case price, with the buyer's case code (CS or CA), and a description starting with the pack size, for example 6 pack - Blacklight Bulb.
A product without a case size goes per item, as EA.
If the cart has part of a case (7 items of a 6-pack), the buyer is asked to fix the quantity before returning the cart.
Shopify: 12 × Blacklight Bulb at 29.58 each, case size 6
Buyer receives: 2 CS at 177.48, "6 pack - Blacklight Bulb"
On purchase orders
The app reads each PO line's own unit:
Unit on the PO
Means
Example
EA (or none)
Single items
3 EA = 3 items
CS, CA, PK
Cases of the product's case size
2 CS of a 6-pack = 12 items
6/CS, 6 CS, 6
Packs of the stated size
2 × 6/CS = 12 items
The order holds single items, priced per item from the PO.
If a product sold by the case has no case size set, the app works out the pack size from the PO price and notes it in the log. Set the case size to be sure.
A quantity that isn't a whole number of cases is kept as sent and noted, so you can adjust it if you only ship full cases.
A unit the app doesn't recognise (for example DZ) is refused with an explanation, rather than guessed.
Orders
Ship-to locations
One buyer often orders for many sites. Each PO carries an ID for the site it ships to. Map those IDs to your Shopify company locations, so each order lands on the right location with its own address and terms.
On the buyer profile, under Ship-to mappings, enter the buyer's ship-to ID and choose the company location. The app looks for a match in this order:
An AccountAccess account number on the PO (ADELPO sends the facility's account number this way).
The ship-to address ID.
The bill-to address ID.
If none matches, the order goes to the profile's default company location, and the log says which IDs weren't mapped. If there's no default either, the PO is refused.
Reference
Transaction log
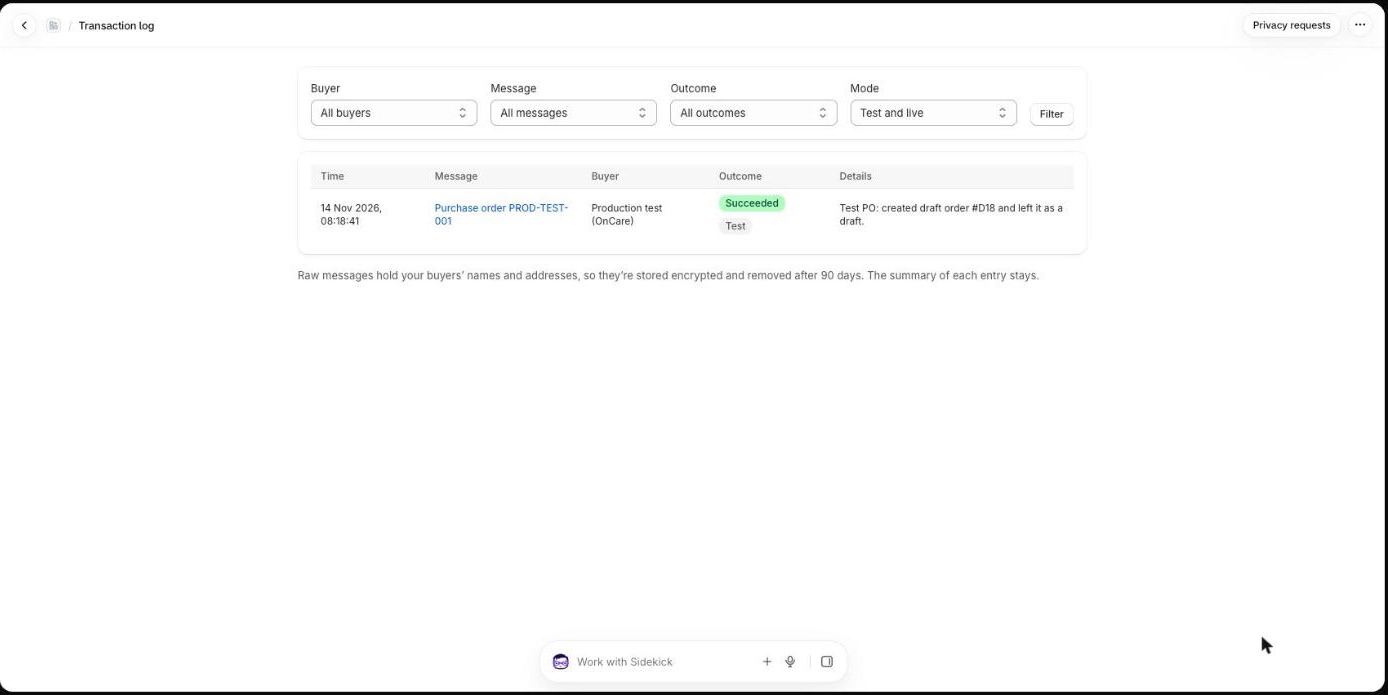
Every PunchOut session, returned cart and purchase order is in the log, with what happened in plain English. Open Log in the app menu.
Filter by buyer, message type, outcome, or test and live.
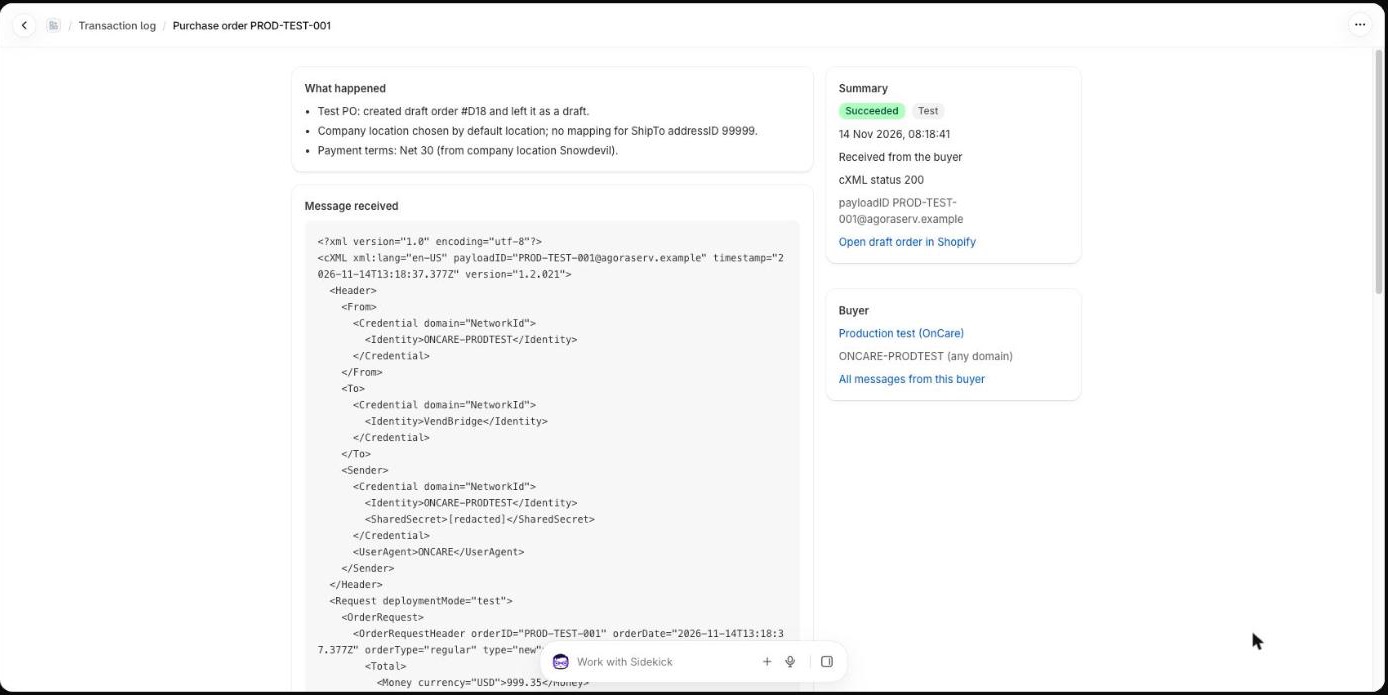
Click an entry to see what happened, the outcome, a link to the Shopify order, and the raw message as received. Shared secrets are always removed before anything is logged.
One entry: what happened, the summary and the message received.
Outcome
Meaning
Succeeded
Done. Notes may still mention things to check, such as a price difference.
Refused
The message was turned away, usually because of a setting you can fix. The entry explains what was sent and what was expected.
Error
Something went wrong on the store's side, for example Shopify was unavailable. The buyer's system is asked to try again.
Raw messages contain your buyers' names and addresses, so they're stored encrypted and removed after 90 days. The summary of each entry stays.
Reference
Troubleshooting
Start with the transaction log: the entry for the failed message says what was sent and what was expected.
The log says
What to do
No buyer profile matches the identity the buyer sent
Compare the identity in the message with the profile's From identity. They must match exactly, including capitals and dashes.
Buyer sent identity … with domain …, but the profile expects domain …
Correct the From domain on the profile, or leave it blank to accept any.
The shared secret the buyer sent does not match
Secrets are case-sensitive and spaces count. Agree the secret with the buyer again; generate a new one if unsure.
… has no matching product
The PO's SKU isn't on any variant in your store. Check the SKU, or whether the product was removed.
… isn't mapped to a company location, and the profile has no default location
Add a ship-to mapping for that ID, or set a default company location.
Refused for missing payment terms
Set payment terms on the company location or the buyer profile, then ask the buyer to resend.
… ordered by the case, but it has no case size
Set the punchout.case_size metafield on the variant, then ask the buyer to resend.
… isn't linked to a Shopify company or customer
Choose Place orders as on the buyer profile.
The buyer doesn't see the Return cart button
Check the app embed is switched on in your live theme (First-time setup), and that the theme was saved. If you changed themes, switch it on in the new one too.
Nothing shows in the log
The buyer's system isn't reaching the app. Check they're using the exact setup URL and order URL from your home page.
Testing a buyer's or supplier's cXML yourself
The free PunchOut tester on our website explains any cXML message you paste (setup requests, carts, purchase orders) and can send a test setup request to any PunchOut URL. Nothing you enter is stored.
Getting help
On the app's home page and on a buyer's Send setup details page, Need a hand? has two buttons: Book a setup call to talk to our team (we can join the call with your buyer's IT team), and Message us, which opens our support form with your store filled in.
Reference
Your data and privacy
Shared secrets, the raw messages in the log and the app's access to your store are encrypted at rest.
Raw messages are removed after 90 days; each log entry's summary stays, with names and email addresses removed.
When a customer asks Shopify for their data, the app lists the log entries that hold it on the Privacy requests page (open it from the log). When they ask for it to be deleted, the app removes their details from those entries.
When you uninstall the app, your store's data is deleted 48 hours later.
Plans are billed through Shopify and differ in how many connections you can have. See the Plan page in the app for your plan and usage.
If you move to a smaller plan, your existing connections keep working; you just can't add more.
If your plan ends, your buyers can keep using PunchOut and sending orders for 7 days, and the app shows a banner. After that, buyers are told the service is paused until you choose a plan.
Reference
Glossary
cXML
The message format procurement systems use for PunchOut and orders.
Setup request
The message a buyer's system sends to start a PunchOut session.
Cart return
The cart sent back to the buyer's system at the end of a session.
Purchase order (PO)
The approved order the buyer's system sends you.
Extrinsic
An extra named field on a cart line or order, for example a cost centre.
UNSPSC
A standard product classification code some systems show.
EA / CS / CA
Units of measure: each, case, case (some systems use CA).
Reference
What's new
The app and this guide moved to punchoutstation.com. Your PunchOut URLs now start with https://punchoutstation.com: if a buyer was given the old vendbridge.fly.dev URLs, send them the new ones from the app.
The app is now called Punchout Station. Nothing changes in how it works: your buyer profiles, PunchOut URLs and settings stay as they are.
Book a setup call or message us straight from the app (Need a hand? on the home and send pages). New free PunchOut tester on our website.
The app has a new icon. This guide, the privacy policy and the terms of service are now on our website.
The setup checklist recognises the cart-return embed reliably, and counts only this app's own embed, not one from another app.
Returned carts are sent in both cXML form fields (cxml-urlencoded and cxml-base64), so more buyer systems read them first time.
Case pricing: products without a case size go per item (EA); choose CS or CA per buyer; purchase orders accept EA, CS, CA, PK and pack sizes like 6/CS.
From domain is optional on buyer profiles and in CSV imports; blank accepts any domain.
Ship-to lookup also checks the AccountAccess account number and the bill-to ID.
Healthcare presets (OnCare, Agora, ADELPO, Procurement Partners) start with the settings those buyers use.